• HOME
Showing posts with label model railways. Show all posts

Some more activity!

Every now and then I get the yen to actually do something on the layout and, sometimes, I actually get to do it!

The first project to get underway laterly was to superdetail and fit a Tsunami chip to one of the Austrains 'roundtop' 36 class I have had lying around idle since I went DCC in the mid-2000s.

The work went well and by 9 November 2014 the detailing work was complete.

 The two photos show above show 'before and after' shots of each side of the loco.

This is a close up of the left hand side of the loco, showing the added Nathan lubricator, plus various pipes and handrails. 


 The right hand side of the loco with the various added 'bits'.


 The right hand side of the tender with fire irons, plus added lamp brackets and handrails and a fall plate between engine and tender.


By 13 November she had been undercoated.


On 14 November a start had been made on weathering.


 The inspiration for the weathering. John Stormont took this photo of 3607 at Cootamundra in 1954 and the photo was originally printed in the January 1990 edition of the RTM's 'Round House' magazine. I am aiming for a scruffy, but reasonably well-kept appearance.


While the weathering is nowhere near complete (plus the loco still has some details to be added, after painting) by 23 November she was 'under trials' on the layout. Unsuccessfully, it turned out, as there appears to be a bind in the mechanism! I'll sort that out before I do any more painting.


Meanwhile, some work has also occurred on the layout. I have finally got around to more work on the backscene behind 'New Yard' and made a start on the foundations of the scenery.

 On 16 November I had painted the section of backscene between the existing Haskell backscene behind 'New Yard' proper and the painted backscene behind the old part of the layout a nice sky blue and started gluing slabs of foam down to form the scenery.


 By the next day the glue had dried and I had carved the foam to the rough shape of the landscape.


 On Saturday 22 November I had attached a modified Haskell backscene between the existing one and the painted section and glued slabs of foam on the yard section of baseboard. The backscenes don't quite match yet, but a little painting at a later date and some judicious tree planting in the foreground will take care of that eventually.


 A shot taken from approximately opposite the station building, showing how the new section will eventually blend in. The road bridge and embankment already makes a good 'view block' between the two scenes (the station and the new yard).


Another shot along the length of 'New Yard' showing a bit more of how it all fits together. I'm looking forward to getting the scenery down as I am heartily sick of running trains on a 'Plywood Central'.

Back Creek Junction and the line to Cowra, developments at Lambing Flat, 2012.


Once Lambing Flat was re-erected in its current home in 2003, other than maintenance and the addition of the occasional minor detail, nothing much changed, other than the addition of DCC and more rolling stock. The track plan was as shown below, very little changed from its Burwood manifestation, other the deletion of the 'south curve' due to its excessively tight (approx. 600mm radius) curve and substitution of a much shorter fiddle yard at that end. 

With this short fiddle yard (no more room in the garage that end) LF could no longer be operated as it was in Burwood, an intermediate through station, plus I wanted to have more happen in the station than just trains crossing and occasionally shunting the yard. I had always liked the operations carried out at Binnaway in NSW's north west where the main traffic on the Dubbo - Werris Creek line came in and exited the yard from the same end, while the branch traffic to and from Gwabegar passed through. I resolved that the main destinations for traffic on the line, 'Cowra' and 'Demondrille' would be the same fiddle yard, meaning that all trains moving between those points would have to reverse in the yard, while the small fiddle yard at the bottom would become the branchline terminus of 'Murringo'. This resulted in most traffic originating the large fiddle yard (at the top), running into the yard, reversing the brakevan and changing engines, then returning to the same fiddle yard (the junction was assumed to be 'beyond the layout'). Occasionally a 'pick-up' would run with traffic for Lambing Flat itself and would spend time shunting the yard and a (usually mixed) train would run 'through' to 'Murringo', connecting with a passenger train running on the 'cross-country' line. This operating pattern worked well for many years, but as more rolling stock was acquired the fiddle yard became very crowded, so I resolved to build a new fiddle yard and move the junction 'on stage', allowing a new scenic section to be constructed, some 20 years after the last extension of the layout (LF is a rural railway, things move slowly!)
 
The basic fiddle yard and baseboard was constructed and made operational in early 2011, but it took till the beginning of 2012 before any progress was made on the scenery. (With playing soccer during the winter and a certain magazine taking up most of my time and energy, progress on the layout can take some time...)
 
By 5 January 2012, this was the scene on the extension.
 
 
The shelf over the extension had been erected, profile boards fitted and a start made on constructing the scenery. The track plan now looked like this:
 
 
This photo shows a 'panoramic' view of the layout, showing how the new section fits in.


Scenery construction is quite conventional with carved styrofoam on a baseboard of particle board.


The concept of the new section is that the line has been cut alongside a creek, crosses the creek and then disappears into a rock cutting, which hides the entrance to the fiddle yard. The bridge is a Hawksmoor 'Large Railway Culvert' kit, obtained from Casula Hobbies (I reviewed it in AMRM Issue 285, December 2010).
 
This is the junction of the new line to the old layout, conveniently situated in the small extension I was able to make between the level crossing and the turnout to the mill when the layout was first re-erected in 2003.
 
 
I'm getting too old and impatient to scratchbuild track these days, so the track is standard Peco code 75 'finescale'. The signal box is a temporary one, while the ash buffer stop is a Uneek whitemetal item.
 
By the next day (6 January) the 'ground' had been added by the conventional method of spreading plaster, tinted with powder colour, and the rock faces cast in plaster using the very traditional method of crumpling up aluminium foil and using it as a mould.
 
The four equally spaced and shaped rock faces along the cutting looked a little 'artificial' (I forgot the 'rule of evens') so after this photo was taken the cutting was altered.
 
By 9 February some progress had been made on painting the scenery, with the rock faces painted using artist's acrylics in an attempt to reproduce the 'look' of the rock outcrops visible just to the south of Cootamundra, a scene that had always fascinated me.
 
 
The rock faces, painted with a combination of artist's acrylic colours and various techniques of application in an attempt to evoke the prototype scene below.
  
 
Two photos of the rock outcrops just south of Cootamundra, 6 November 2011.
 
 
I haven't quite got the colour of the lichen right, but it is getting there! The level crossing detail is starting to appear with a Uneek stock guard and the level crossing signs (SJM kits) installed.
 
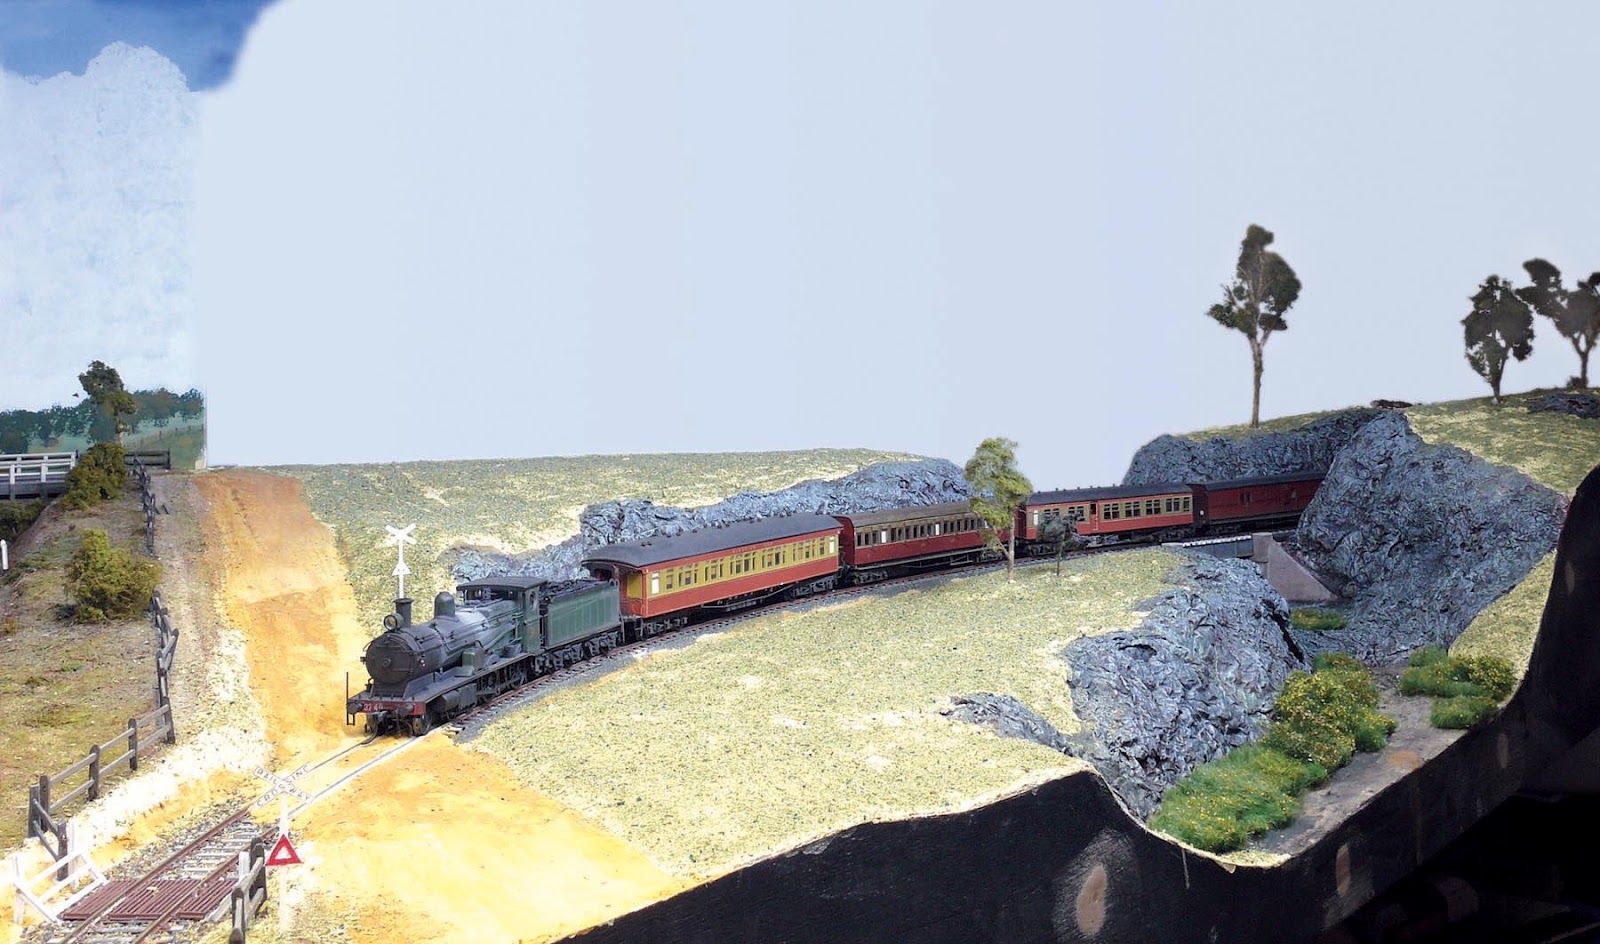
P class 3324 rolls towards the junction with a goods train, mainly consisting of RU wheat hoppers, on 9 February 2012.
 
A couple of days later (11 February) and the first layer of ground cover had been added (dyed sawdust), a start made on the vegetation in the creek and the first trees starting to appear.
  
By 16 February the colours of the rocks had been 'adjusted', the fences were in and the detail such as trees, bushes, weeds etc. were starting to appear. The second stock guard (also Uneek) has been added and the beginnings of the home signal temporarily in place.
 
Another view of the scene with an ancient (visiting) Berg's 30 class tank passing on the school train.
  
By 6 March a lot of extra scenery detail had been added, courtesy of Woodland Scenics and miniNatur!
 
The home signal had also been completed and temporarily added to the scene.
 
The grass tufts and other material available from miniNatur allow a lot of fine scenic detail to be added quickly.
 
More scenery, including some nice 'Patterson's Curse' using miniNatur material. The home signal is a slightly modified Uneek casting that has been made to work.
 
Not much was done between March and September (soccer season!), but during October a few more items were completed, some of which are shown below and some of which will be detailed in future posts.
 
More scenic detail, this time a Uneek horse cart that has lost a wheel and been abandoned near the creek.
  
A 'panoramic' view of the junction taken on 9 November 2012. The junction has been named 'Back Creek Junction', a very typical Australian name for a creek and also the name of a real creek in my home town, Young NSW, which is where Lambing Flat is supposedly set. 
 
A closer view of the junction as it is on 9 November 2012. The junction bracket and the new signal box have been installed and final detailling of the scenery is proceeding.
 
However, the focus of new construction has now moved to the other end of the layout...
 
 
More to come...


A Visitor to Lambing Flat...

While it has been a while since my last post, I haven't been completely idle. Hopefully I will 'catch up' with events in due course, but in the meantime, here are a couple of photos of a recent visitor to Lambing Flat.

My good mate, Chris Sim, has been busy over the last couple of years, working on models of the NSWGR's fastest (allegedly ;) railmotor, CHP38, known as 'Creamy Kate', and a 500 class trailer, which 'Kate' often hauled at times of excess patronage.
Here, Chris's completed model rests in the platform. While Chris had modified the model a little, he has kept it in the post-1972 condition that the SJM kit portrays. I was quite impressed with the way he has painted the two vehicles (authentically) in different shades of Indian red. The 1970s version of Indian red was a darker, bluer shade than the colour used in the 1950s/'60s, especially when newly applied.

Here she is approaching Lambing Flat from the Cowra direction, passing over the bridge over Back Creek on the new section I have been working on over the last couple of months. More on this new section (the first new section of scenery on LF for about 20 years!) in future posts.

Pretty pictures...

Was playing around with the camera recently and took these shots...
This shows my Classic brass 3324 drifting through the station after her recent 'tone up' to the weathering. Originally painted in the mid-1980s, the paint had become a little 'tired' and faded over the years (there is a 'before' picture in an earlier post) so I gave her a touch up. After a good wash (being very careful not to get the DCC chip and speaker in the tender wet!) I touched up the areas where the paint had worn off the brass with a spray of SEM self-etch black, let down with a little SEM grey. When that had dried  I reweathered the loco with Tamiya and Badger acrylics, diluted in Isocol alcohol.

Here is another shot of her, which also includes part of a recently 'backdated' On Track Models LLV. The backdating consisted of moving the outer lamp irons to the high position they occupied before the late 1970s, plus adding the end handrails removed when the lamp irons were lowered. Buffers and AR Kits 'Andrews' bogies have also been added.

Here is close up view of the LLV.
It was weathered by 'washing' a little dilute in Isocol alochol Tamiya XF-10 Flat Brown into the wheel discs, the bogie springs, the door hinges and the door catches. Then a light spray of very dilute in Isocol Tamiya XF-52 Flat Earth all over to give that typical 'dusty' look. 
 
I've also managed to finish off the 53 class, it has had the paint damage (mostly!) touched up, glass fitted to the headlight, a rolled up canvas weathershield added behind the cab and a new fireman recruited.


Well, I thought it was finished until I read Ray Pilgrim's recent post on the easy way to add a 'chuff' cam...

Last, but not least, a 'what used to be', or perhaps a 'what will be again', once I get a DCC chip fitted.
My dear old Trax brass 1248 standing at the station with a typical 1950s branchline passenger train, two 'dogboxes' and a van. This scene may soon be able to be recreated again, now that Ian Phemister has shown me the way to get a Tsunami into the 'small engines'... 

To good not to share...

Mike McCormac came over a couple of days ago with an (almost ;o) completed sample of one of the variations of his HO scale NSWGR LFX 'dogbox' kits for photographing for the 'Recent Releases' section of the December issue of AMRM.

It really is a mouthwateringly good model and I could not resist posting one of the photos that didn't get used in AMRM!
This is one of the first batch of high elliptical roofed cars which were fitted with the 'old' type underframe and short wheelbase bogies. Later batches had a redesigned underframe with longer wheelbase bogies in an attempt to improve the ride. Click on the image to see a much bigger image to truely appreciate the detail, which includes compartment interiors.

Models don't come much better than this!

The Clever Things You Find on the Internet...

Was reading the Australian_N_Scale Yahoo group when 'Mark' made a post regarding downloadable containers. Now Lambing Flat has no need of containers, and never will have, but I'm a curious sort of fellow, so I went and had a look. What I found was a German language site aimed at ship modellers, but with a page of downloadable containers in various scales (including HO and N scale) to print out on a card, cut out and assemble. Having a couple of pieces of card handy, I printed a couple out and assembled them, which took about five minutes.


They would look pretty effective as 'background' at a container depot and would be a lot cheaper than buying scores of injection moulded containers. They could even be used on wagons, if one was so inclined.

These, (and many others) can be downloaded at: http://www.igshansa.de/igsorg.html (then go to the 'Download/English' page.

Amazing what is available on the net these days...